How to Export Your Data from SwimBiz (And What to Do Before You Start)
SwimBiz generates 10 CSV export files. Here's what each one contains, how to clean your data, sync your GoCardless mandates, and the exact import sequence to follow.
If you're thinking about switching from SwimBiz, the first question most owners ask is: "Can I get my data out?"
The answer is yes — and SwimBiz is actually quite good at letting you export everything. But there are things you need to do in the right order, and a few SwimBiz-specific gotchas that will catch you out if you don't know about them.
At Vale Swim Academy, we migrated from SwimBiz to ClassBase after several years of running the school on it. We have export files going back to 2018. Here's exactly what we did and what we'd recommend.
Step 1 — Back Up Everything, As Far Back as It Goes
Before you change anything or export anything for migration purposes, do a full archive export of all your data.
This is separate from the migration export. The purpose is simply to preserve your complete historical record — income reports, attendance history, invoice data, everything — in case you ever need to refer back to it.
At Vale Swim Academy, we have SwimBiz exports going back to 2018. Will we ever need them? Probably not. But there are situations — HMRC queries, parent disputes, insurance claims — where historical records matter, and once you've cancelled SwimBiz you can't go back.
Before you do anything else, export:
- Income reports from your earliest records to today
- Account receivables reports
- All customer and student data (full history, not just active)
- All attendance history
Save everything in a clearly labelled archive folder. This takes 20 minutes and is worth doing regardless of which platform you move to.
Step 2 — Note Your GoCardless API Credentials
This is the step most migration guides miss entirely, and it's one of the most valuable parts of switching from SwimBiz.
SwimBiz requires you to set up your own GoCardless account. Unlike some software platforms that integrate GoCardless at a platform level, SwimBiz has always pointed you at GoCardless directly. That means the GoCardless account is yours — and so are all the parent mandates in it.
Before you do anything else, go into your GoCardless account and note down your API credentials. You'll need these to connect ClassBase to the same GoCardless account.
Why does this matter? Because of what happens in Step 8.
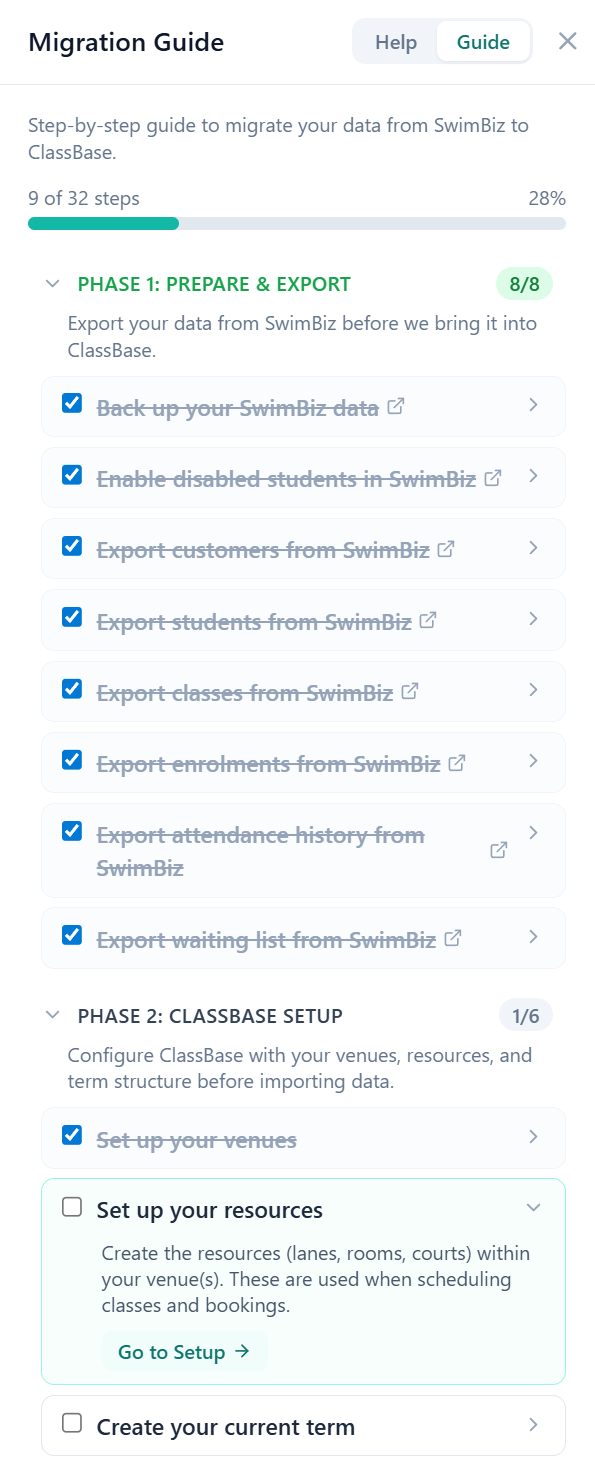
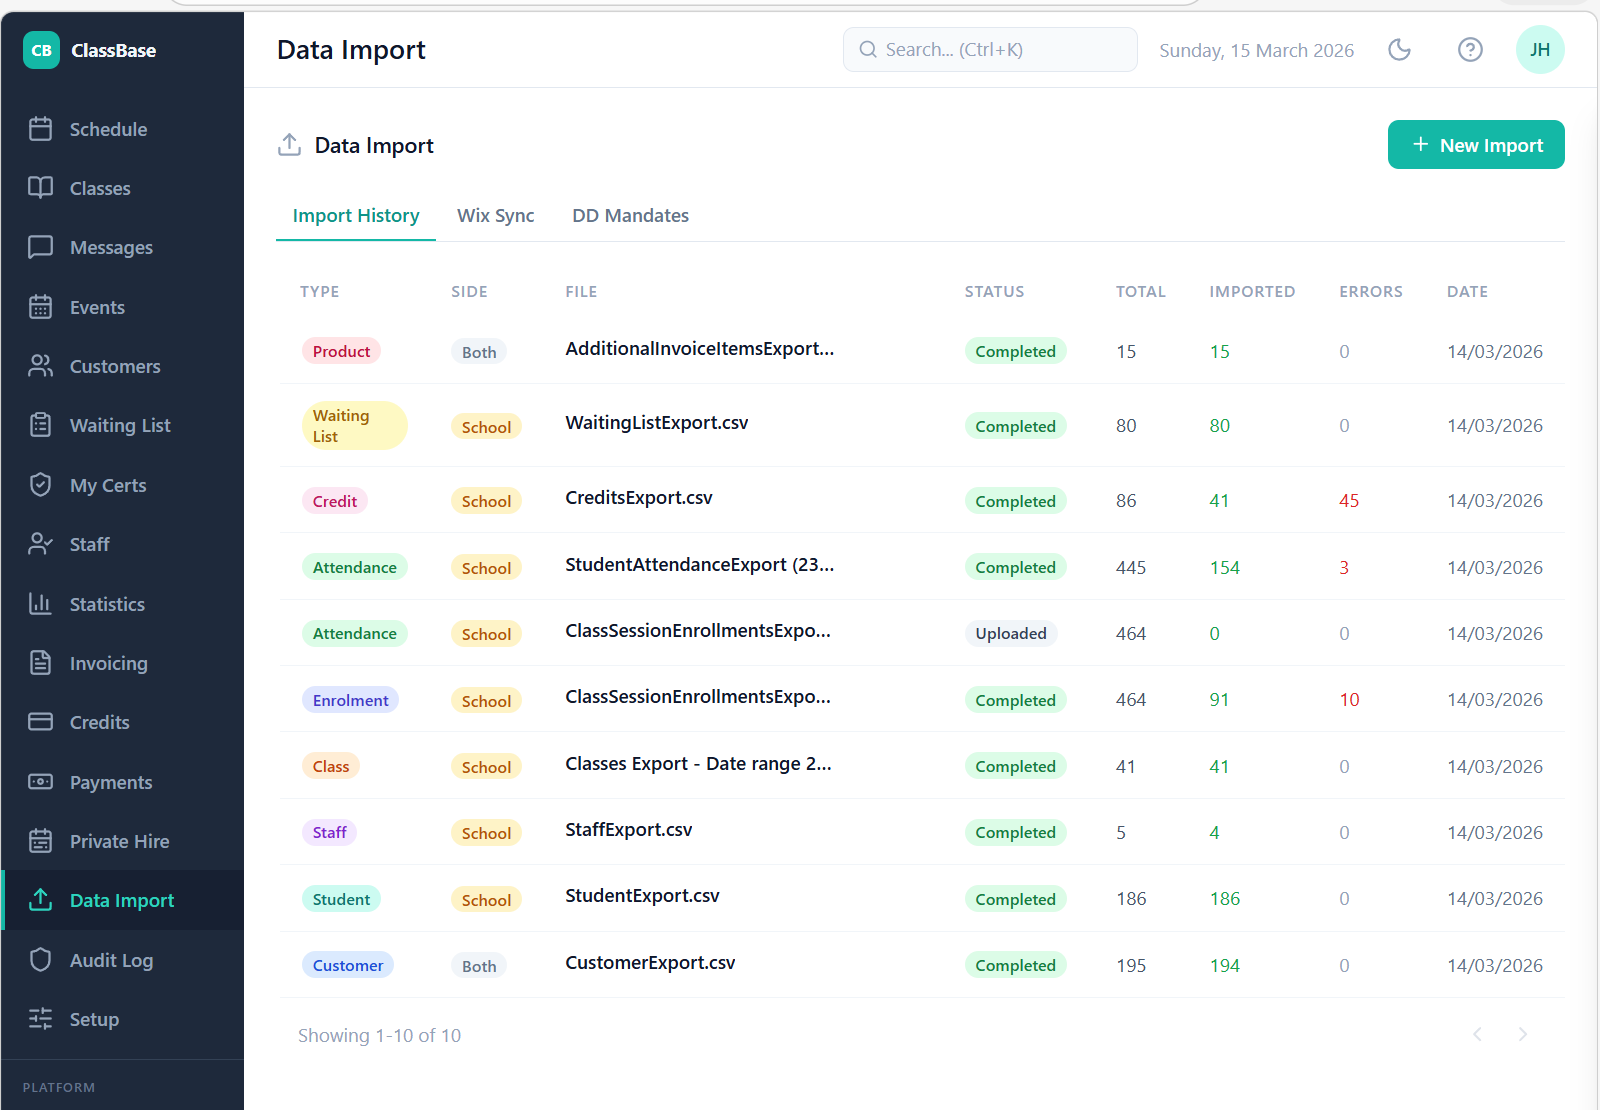
Step 3 — Understand SwimBiz's 10 Export Files
SwimBiz generates 10 CSV exports that between them cover everything in the system. Knowing what each one contains helps you decide what to import and what to leave behind.
| # | Export file | What it contains |
|---|---|---|
| 1 | CustomerExport.csv | All customers — names, addresses, contact details, email addresses |
| 2 | StudentExport.csv | All students/swimmers — names, DOBs, medical notes, assigned levels |
| 3 | StaffExport.csv | All staff — names, contact details, role assignments |
| 4 | Classes Export (Date range).csv | Classes within a date range — name, day, time, level, capacity, fee |
| 5 | ClassSessionEnrollmentsExport.csv | Which students are enrolled in which classes |
| 6 | StudentAttendanceExport.csv | Session-by-session attendance records |
| 7 | WaitingListExport.csv | Customers/students on waiting lists |
| 8 | WaitListExport.csv | Secondary waiting list format (SwimBiz has two variants — export both) |
| 9 | CreditsExport.csv | Outstanding credits on customer accounts |
| 10 | AdditionalInvoiceItemsExport.csv | Additional invoice line items |
You don't need to import all of these. You're making a fresh start — the question is what data you want to carry forward.
Step 4 — Clean Your Data Before Exporting
SwimBiz charges per active swimmer. If you've been running your school for several years, you'll have students in the system who stopped swimming years ago but are still technically "active." If you import them all, your new platform will count them against your student limit.
Before exporting for migration, go through your student list and deactivate anyone who is no longer attending. Do the same for customers — filter to active only and remove dormant accounts.
At Vale Swim Academy, we imported only active customers and students — people who were either currently enrolled or on the waiting list. Historical leavers stayed in the archive but didn't come across into ClassBase.
Similarly for staff — we only imported currently active instructors. There's no reason to bring across staff who left two years ago.
Step 5 — The Waiting List Warning
This is the gotcha that catches the most people out.
Waiting list students are stored separately from enrolled students in SwimBiz. When you export your student and enrolment data, waiting list students are not automatically included — they're in the WaitingListExport.csv and WaitListExport.csv files separately.
If you don't deliberately export and import your waiting list, those students get left behind. Families who have been waiting months for a place simply won't exist in your new system.
SwimBiz has two waiting list export files with slightly different formats. Export both, check what's in each one, and make sure you import them into the waiting list section of your new platform — not as enrolled students.
At Vale Swim Academy, our waiting list was one of the most important things to carry across correctly. Those are warm prospects — families who want to be with you. Losing them in a migration would have been a real problem.
Step 6 — Decide What You're Actually Importing
You don't have to import everything, and being selective makes the migration cleaner.
What we imported:
- ✓ Active customers only
- ✓ Active students only
- ✓ Current classes
- ✓ Active enrolments
- ✓ Recent attendance history (current term)
- ✓ Waiting list entries
- ✓ Current credits
- ✓ Active staff only
- ✓ Additional invoice items
What we left behind:
- ✗ Former staff — only active instructors came across
- ✗ Historical leavers — customers and students not active in over a year
- ✗ Old financial data — kept in archive, didn't need it live in the new system
- ✗ Years of historical attendance — imported the current term, archived the rest
Step 7 — The Import Sequence in ClassBase
ClassBase's migration wizard handles SwimBiz data in 9 steps, and the order matters because each step references the previous one — enrolments need students and classes to already exist, attendance needs enrolments, and so on.
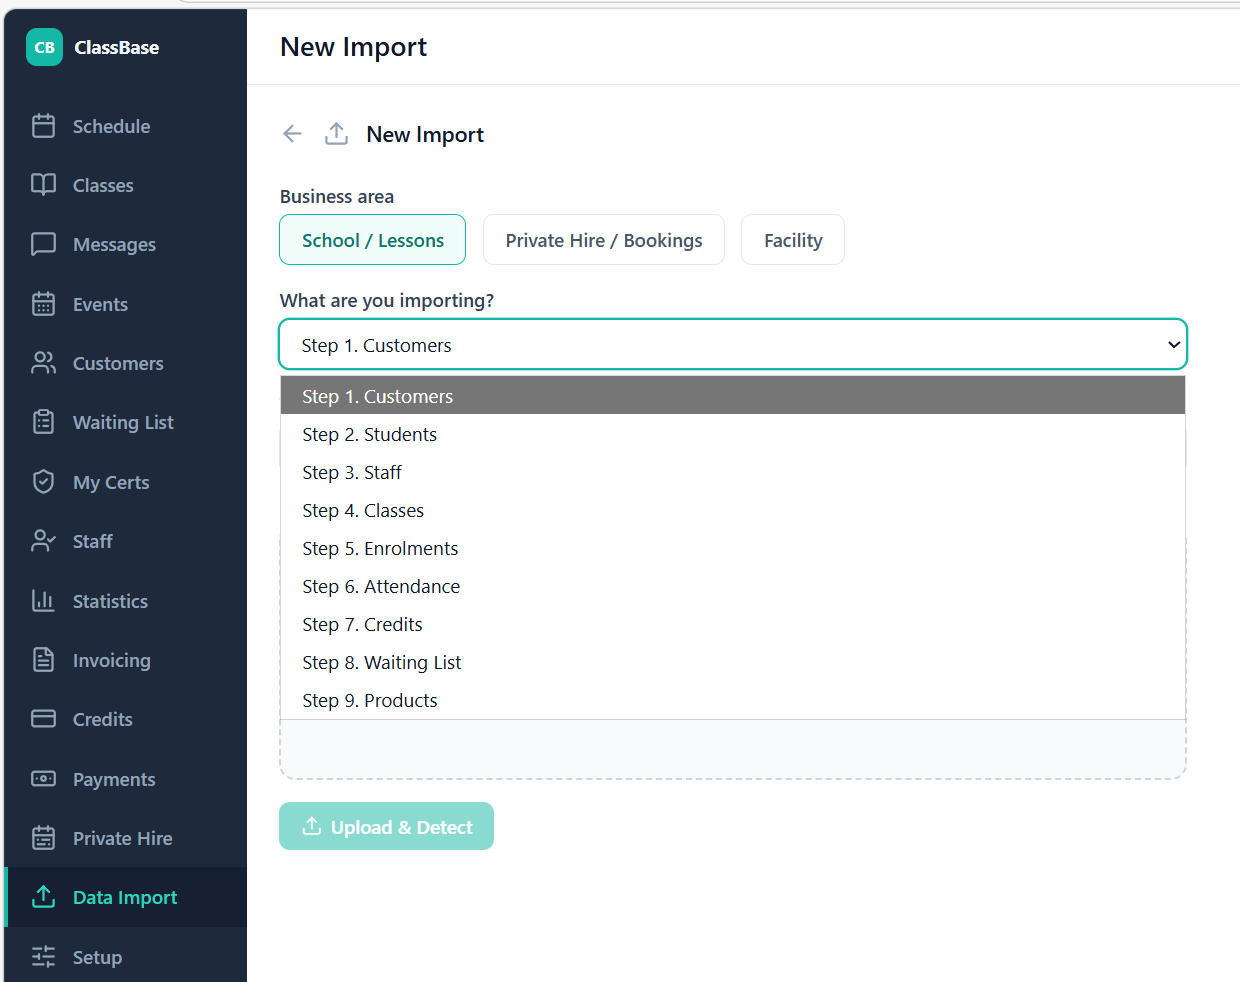
| Step | Data type | SwimBiz export file |
|---|---|---|
| 1 | Customers | CustomerExport.csv |
| 2 | Students | StudentExport.csv |
| 3 | Staff | StaffExport.csv (active only) |
| 4 | Classes | Classes Export (Date range).csv |
| 5 | Enrolments | ClassSessionEnrollmentsExport.csv |
| 6 | Attendance | StudentAttendanceExport.csv |
| 7 | Credits | CreditsExport.csv |
| 8 | Waiting List | WaitingListExport.csv + WaitListExport.csv |
| 9 | Products | AdditionalInvoiceItemsExport.csv |
ClassBase has SwimBiz-specific import templates pre-loaded. Column mapping is largely automatic, and the validation step before each import catches issues — duplicate emails, missing required fields, references to students who don't yet exist — so you review and fix before anything goes live.
Step 8 — Connect GoCardless and Sync Your Existing Mandates
This is where the fact that you own your GoCardless account pays off.
Once your customer data is imported into ClassBase, go to Data Import → DD Mandates → Fetch Active Mandates.

ClassBase connects directly to your GoCardless account via the API and pulls all active mandates in real time. It then matches each mandate to your imported customers by email address — and links them automatically.
The result: your existing parent mandates are connected to their ClassBase accounts without you having to ask a single parent to do anything. No re-invitation emails, no waiting for parents to act, no gap in your payment collection.
This is the biggest practical advantage of the fact that SwimBiz made you own your GoCardless account. The mandate belongs to you, not to SwimBiz. When you switch platforms, you take it with you.
For any customers who don't have a mandate — new enrolments, or anyone whose mandate has lapsed — ClassBase's parent portal lets them set up a new mandate themselves in about two minutes.
Step 9 — Wix Sync (If You Use Wix for Pool Hire)
If you've been running pool hire bookings through Wix Bookings alongside SwimBiz, ClassBase also has a Wix API Sync that imports contacts, booking services, bookings, and memberships directly from your Wix site — more reliably than CSV export because it pulls structured data via the API.
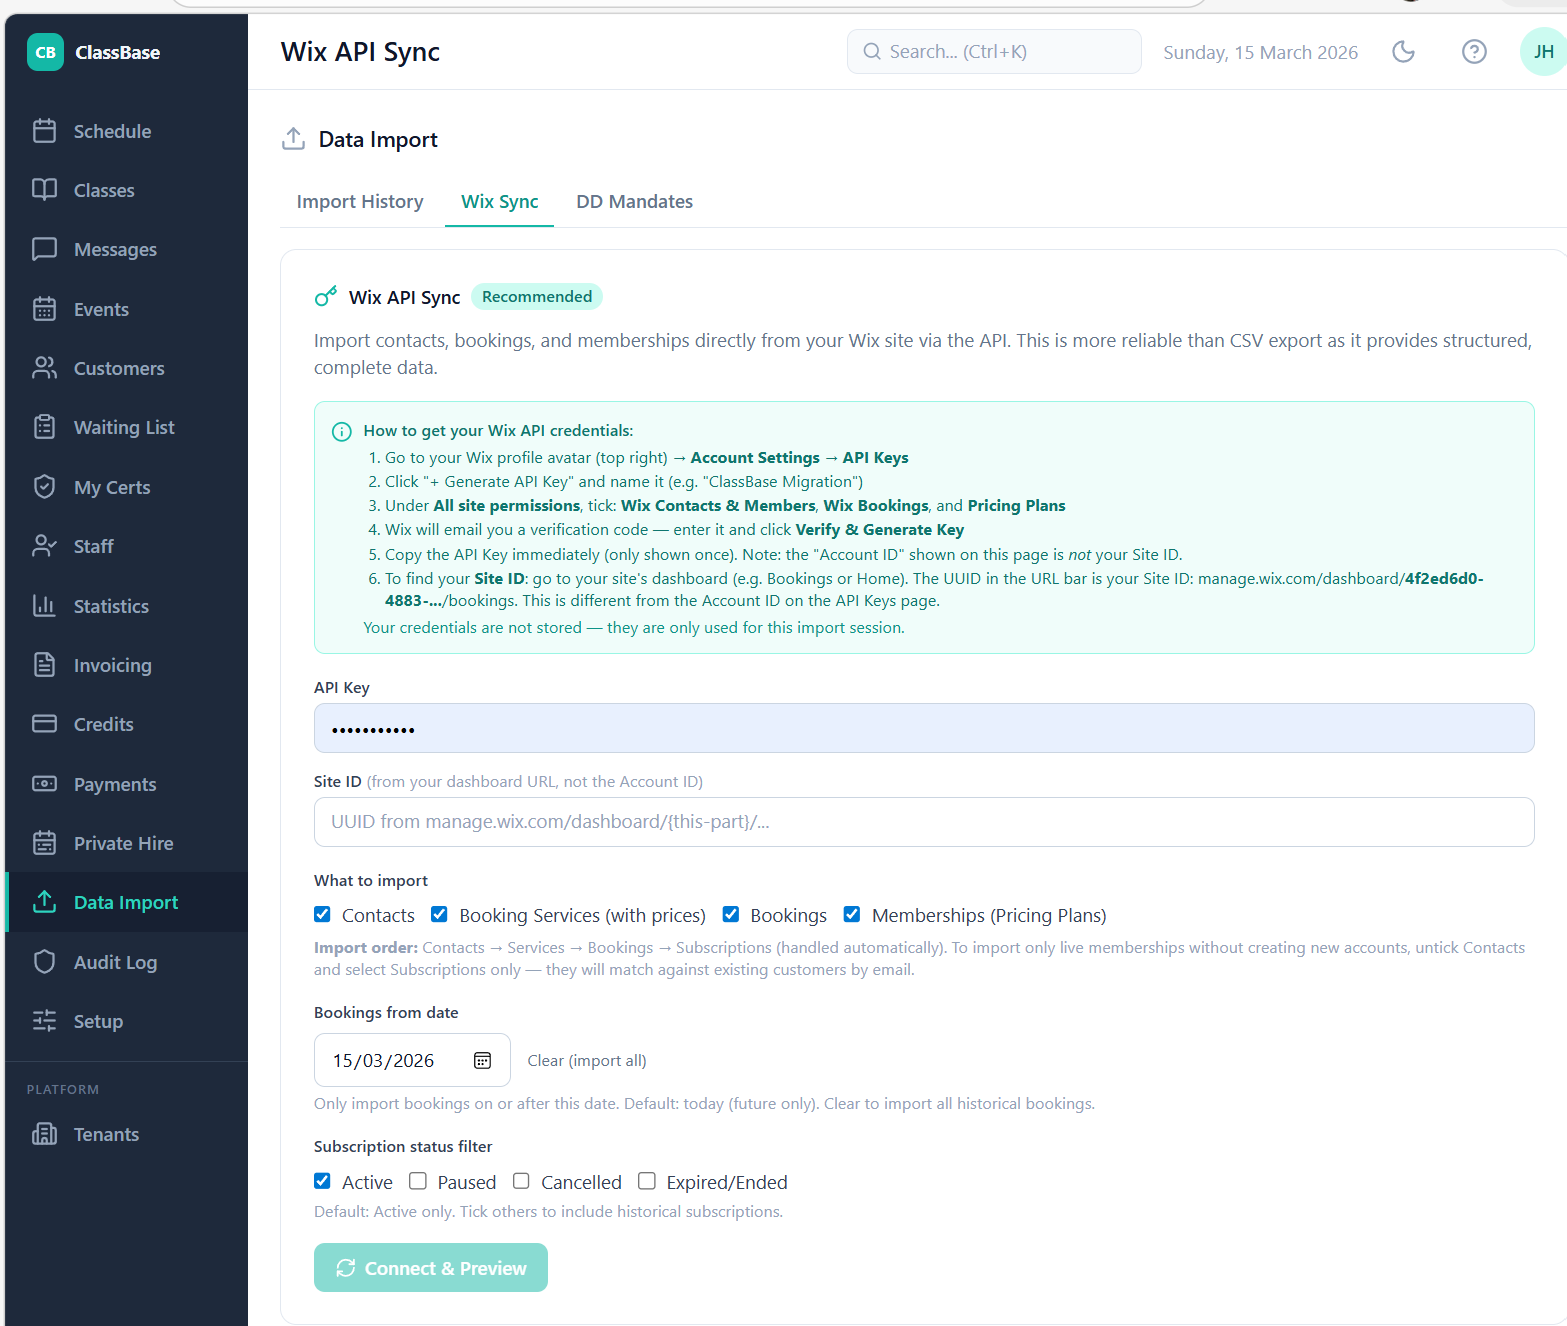
To use it:
- Go to your Wix profile → Account Settings → API Keys
- Generate a new API key with permissions for Wix Contacts & Members, Wix Bookings, and Pricing Plans
- Find your Site ID from the UUID in your Wix dashboard URL
- Enter both into ClassBase's Wix Sync tab and click Connect & Preview
You can choose what to import — contacts, bookings from a specific date, active memberships only — and preview the data before committing. ClassBase handles the import order automatically (contacts → services → bookings → subscriptions).
This means if you're switching from the combination of SwimBiz + Wix Bookings to ClassBase, you can bring everything across in a single migration session.
Step 10 — Configure Agreements, Then Invite Customers
Once your data is imported and mandates are synced, there's one more step before parents can access the portal: you need to invite them to create their ClassBase accounts.
Go to Setup → Invitations → Invite Customers. ClassBase shows you every imported customer who has an email address but no portal account yet. At Vale Swim Academy this was 294 customers — all invited in a single bulk action.

But before you send invitations, check the Agreements tab first.
ClassBase will warn you if no agreements are configured: "Customers won't be asked to accept any terms when they set up their account." The invitation flow is when parents accept your terms and conditions — swimming lesson T&Cs, your data protection policy, whatever agreements you require. If you send invites before configuring these, parents create accounts without signing anything.
The correct order:
- Setup → Agreements — configure your T&Cs and data policy
- Setup → Invitations → Invite Customers — bulk select and send
- Setup → Invitations → Invite Staff — send portal invites to active instructors
Parents receive an email with a link to create their account. When they follow it, they accept your agreements and set their password. From that point they can view their schedule, check invoices, see their child's progress, and manage their DD mandate — all without contacting you.
Monitor the Invite Status tab to track who has activated their account and follow up with anyone who hasn't after a week.
How Long Does It Take?
With prepared, cleaned CSV files, the actual import into ClassBase takes under an hour for a school of 150–300 students. The GoCardless mandate sync takes minutes. The preparation — cleaning the data, doing the archive backup, noting the GC credentials — takes longer, but that's time well spent regardless.
At Vale Swim Academy, the full migration took an afternoon. We ran both systems in parallel for one term — continuing on SwimBiz for the current term while setting ClassBase up for the new one. By the time the new term started, ClassBase was fully configured and we switched over completely.
Complete Migration Checklist
Before You Start
- Archive backup — export all data, all history, back to day one
- Note GoCardless API credentials
Clean Your Data
- Deactivate historical leavers in SwimBiz (avoids inflating student count)
- Remove former staff from StaffExport before importing
- Filter customers and students to active only
Import into ClassBase (in order)
- Step 1 — Customers (CustomerExport.csv)
- Step 2 — Students (StudentExport.csv)
- Step 3 — Staff (StaffExport.csv — active only)
- Step 4 — Classes (Classes Export date range.csv)
- Step 5 — Enrolments (ClassSessionEnrollmentsExport.csv)
- Step 6 — Attendance (StudentAttendanceExport.csv)
- Step 7 — Credits (CreditsExport.csv)
- Step 8 — Waiting List (WaitingListExport.csv + WaitListExport.csv)
- Step 9 — Products (AdditionalInvoiceItemsExport.csv)
Connect Payments
- Data Import → DD Mandates → Fetch Active Mandates (existing parent mandates link automatically by email)
- Wix API Sync if moving pool hire bookings across too
Activate Parent Accounts
- Setup → Agreements — configure T&Cs before sending invitations
- Setup → Invitations → Invite Customers — bulk send
- Setup → Invitations → Invite Staff — invite active instructors
- Monitor Invite Status tab — follow up after one week
Go Live
- Run in parallel for one term before switching over completely
- Cancel SwimBiz once new term is running smoothly